
Zwift Play Protocol
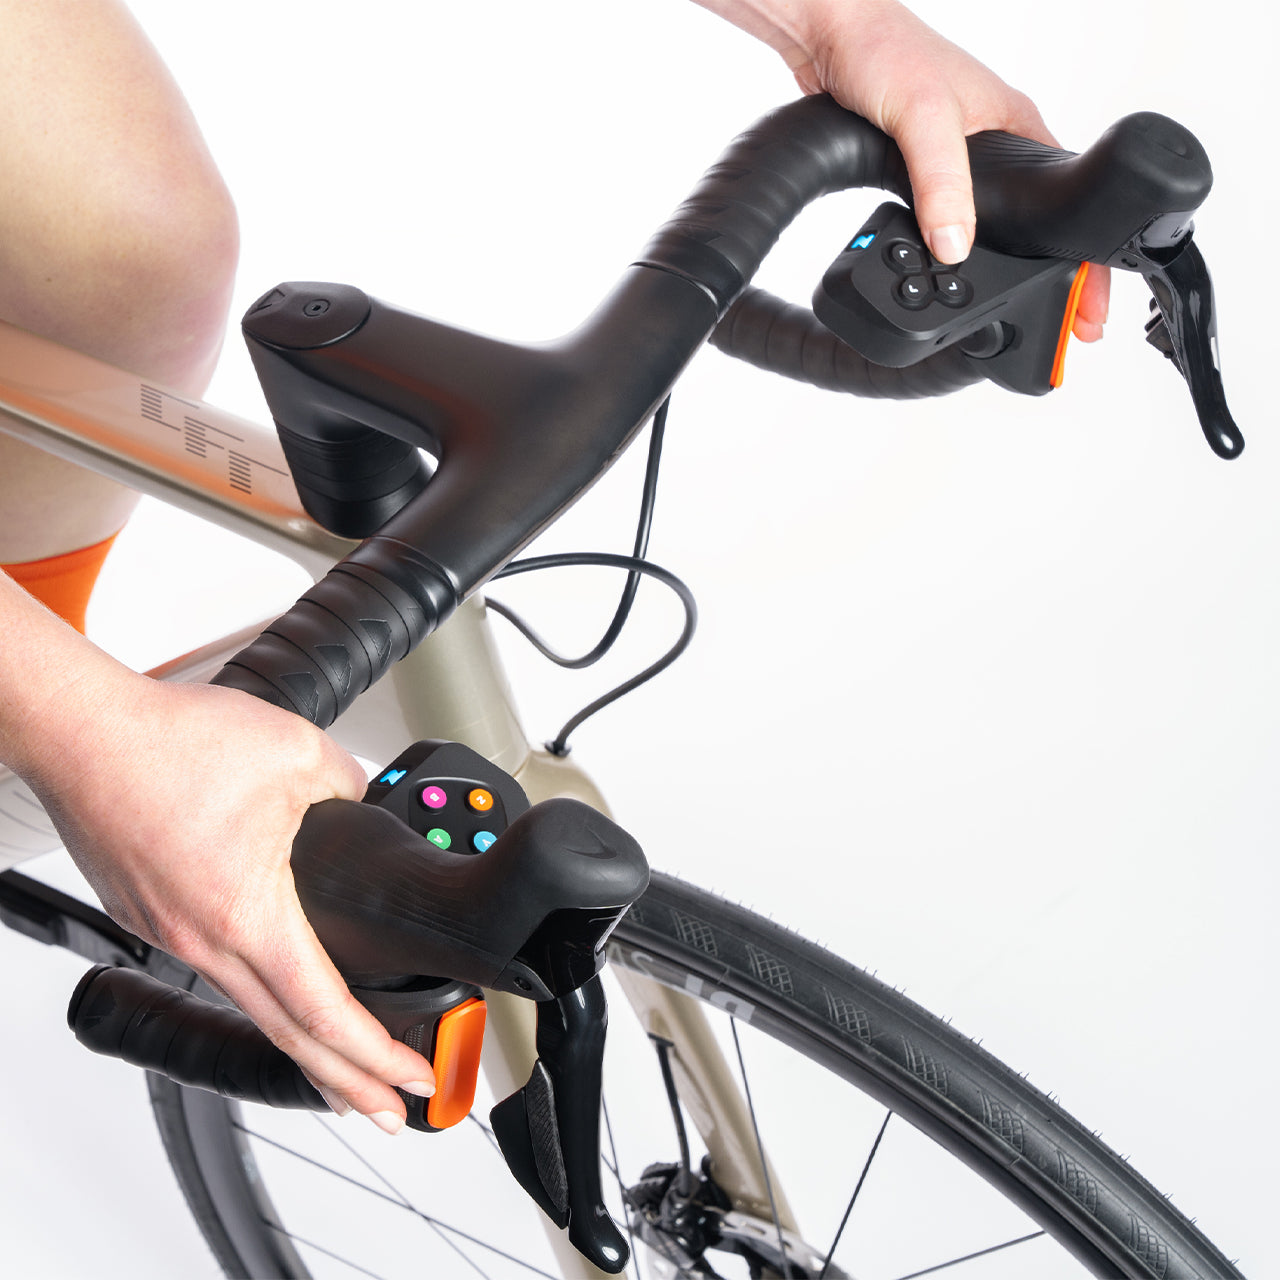 Zwift Play is the especialty gamepad Zwift has developed and built, meant to be attached to a road bicycle handlebars.
The controller set is made up of 2 separate controllers, for right and left side of the handlebars.
These controllers are BLE enabled, they communicate with Zwift App over BlueTooth Low Energy, using a few standard services and one proprietary service.
Before you proceed to read this documentation, a disclaimer: this documentation is written based on reverse engineering the protocol, no information contained in this document is official or in any way provided by Zwift Inc. or any of their employees or partners.
This means some of the information contained in this document may be wrong or incomplete and you should use it at your own risk. I’m not to be held responsible of any damages in hardware or software that uses this information to establish communications.
If you need further directions or clarifications or want to contact me, throw an email to makinolo at gmail
BLE Advertising
Both devices (right and left keypads) advertise in BLE as “Zwift Play” and they list their main proprietary service in the complete list of 128 bit service UUIDs.
The advertising packet contains a brief 5 byte manufacturer data field in the following format:
| Manufacturer ID (2 byte) | Controller side (1 byte) | Short Address(2 byte) |
|---|---|---|
| 0x094A | 2 = Play Right 3 = Play Left 9 = Click | Last 2 bytes of the BLE address |
BLE services
The 2 standard services the device exposes are DIS (Device Information Service UUID 180A) and the BAS (BAttery Service UUID 180F)
Apart from those 2, it presents a 3rd service with UUID 00000001-19ca-4651-86e5-fa29dcdd09d1
This is the Zwift Play Service, or RC1 (Race controller as they call it internally)
Race Controller service
The proprietary service has 3 characteristics, as many other services do:
- Measurement, Notifiable: 00000002-19ca-4651-86e5-fa29dcdd09d1
- Control Point (commands) Writable: 00000003-19ca-4651-86e5-fa29dcdd09d1
- Command response, Indicable and Readable: 00000004-19ca-4651-86e5-fa29dcdd09d1
On startup the Measurement characteristic is not notifying, even if you subscribe to it. The device needs to be activated first.
The device uses encryption for this service, meaning you need to first do some kind of a handshake to exchange public keys before the unit starts broadcasting data.
Usually the first action to take is to read from the command response characteristic. If it’s empty, you’ll need to start the handshaking, if it returns a RideOn message, which we will see later, it means the device does already have a session that can be reused, although it’s ok if you just restart the handshake anyway.
Encryption scheme
The service uses a tailor made encryption scheme, heavily based on the Security section in BLE Core specification for Security Mode 1, Level 4.
The system uses ECDH (Elliptic Curve Diffie Hellman) for the public key exchange and HKDF (HMAC Key Derivation Function) to derive a shared key.
With the shared key, AES-CCM (Counter with CBC-MAC = Counter with Cipher Block Chaining Message Autentication Code) is used to encrypt and decrypt the messages both ways.
Key exchange
Both parties generate a public/private key pair based on points from a Diffie Hellman curve. The chosen curve is NID_X9_62_prime256v1, also known as nistp256 or secp256r1, which is defined in the standard ANSI X9.62.
Once the key pair is generated, we get the app public key (which is just a point of the curve), and send it to the device, writing it to the Control Point.
Note that on obtaining the curve point, you need to specify if you want the compressed, uncompressed or mixed format. We want the uncompressed and it will come prefixed with a byte of value 4 that indicates it’s uncompressed.
We need to remove that first byte to get our usable (sendable) app_public_key.
The format of the public key to be exchanged is also proprietary. We need to prepend 8 extra bytes, the literal “RideOn” followed by 0x01 0x02.
0x52, 0x69, 0x64, 0x65, 0x4f, 0x6e, 0x01, 0x02 + app_public_key
The device will reply with an indication containing his own public key, with a similar format, “RideOn” followed by 0x00 0x09 (sometimes 0x01 0x03, I don’t know what it means but it doesn’t seem to make any difference):
0x52, 0x69, 0x64, 0x65, 0x4f, 0x6e, 0x00, 0x09 + device_public_key
Now that you have the device public key, you need to go to the next step, which is deriving the actual symmetric key that will be used to encrypt all the traffic.
ZwiftPlay, following BLE security directives, uses ECDH to create a shared secret first and then HKDF (HMAC Key Derivation Function) to derive the symmetric key from it.
The shared secret is calculated using the ECDH function providing this parameters:
- size of the key, which is the degree of the DH curve used to extract the point (point = public key), in our case 64
- device public key
- our private key
In order to derive a HKDF key we need to provide the HKDF function with the following:
- ECDH secret obtained in the previous step
- A Message Digest function (also known as Hash function), in this case is SHA256
- A key length, 36 bytes in this case
- A Salt value, which in this case is the concatenation of both public keys, the device public key material received and the local public key material, in that order
Now you have the shared key and you can start encrypting and decrypting with it.
Decryption
As explained before, the actual encryption uses AES-CCM. When you receive an encrypted message from the device, you’ll observe this format:
| Counter | Encrypted Message | MIC / MAC |
|---|---|---|
| C1 C2 C2 C4 | E1 E2 E3 … En | M1 M2 M3 M4 |
- First there is an unencrypted 4 byte counter (Little endian)
- A variable length encrypted message
- A 4 byte MIC/MAC/TAG (MIC is BLE terminology, Message Identification Code, MAC in AES terminology, Message Authentication Code)
For decryption you need to extract the 3 parts of the message and call the AES-CCM decrypt function with:
- The AES mode, wich is aes-256-ccm
- The IV (initialization Vector) also called nonce (number used once) which is an 8 byte array whose 4 first bytes are the 4 last bytes of the HKDF symmetric key, followed by the 4 bytes of the counter you have received in the message.
- The IV / nonce length, which is 8 bytes
- The received MIC, so the algorithm can compare his own calculated MIC with the one provided and authenticate the message
- The received message (only the remaining bytes in the message after stripping the counter and the MIC)
If all the data provided is correct and the MIC is validated, we will get the plain message back, of the same length as the encrypted message.
Unfortunately, if there is a validation error, not only we won’t get the decrypted message, but most likely we won’t get any hint or error message indicating what went wrong.
That is a specification of AES-CCM to make it harder the guess work in finding the proper IV, MAC, and counter values
Encryption
The Encryption procedure is practically the same. We need to store a counter that gets incremented every time a message is sent successfully.
- Set the nonce length
- Set the MIC length
- Provide the shared key and the nonce to the encryption initialize function
- Input the message we want to encrypt into the encryption function
- Finalize the encryption
- Retrieve the MIC from the cypher context
With all that done, you’ll have the counter, the encrypted message and the MIC. All you need to do is stitch them together in that order and write it to the Control Point characteristic.
Protocol Messages
Once the messages are decrypted, now we can start interpreting the contents.
Every notification received has 2 possible formats, the idle message and the button press combination message.
The idling message is just a one byte message containing the code 0x15 (21) notified at around 1Hz
2023-11-16 Note: Thanks to Github user ajchellew I've realized the message is a protocol buffers one. You can still decode it manually in the way I explain below, but it will be easier if you use a protobuf library like he does in his Zwift Play decoding project. We don't have access to the original .proto message definition file though
Key press messages
When a button is pressed in the device, the following 19 to 21 byte structure is received
07-08-00-10-01-18-01-20-00-28-01-30-01-38-01-40-00-48-00
The first byte is constant, is the op code for button status 0x07. This is not part of the protocol buffers message, because it contains an illegal wire data type (7).
After that we get a list of tag – value pairs. They contain every button status. For the normal buttons, status is 0 for pressed and 1 for not pressed.
For the analog joystick (the orange ones) you get a value of 0 when not pressed and a numeric value when pressed, that indicate how far right,left or braking they are being pushed.
The tag contains a field number which is actually the button number or identifier. The lower 3 bits indicate the data type (0 is varint, they are all varint) and the other 5 bits are the actual identifier number itself.
| TAG | PB Field | Button in device |
|---|---|---|
| 0x08 | 1 | Right(0) or Left(1) Pad identification |
| 0x10 | 2 | Button Y or ^ |
| 0x18 | 3 | Button Z or < |
| 0x20 | 4 | Button A or > |
| 0x28 | 5 | Button B or v |
| 0x30 | 6 | Button ON/OFF |
| 0x38 | 7 | Button Shifter |
| 0x40 | 8 | Orange Joystick push Left/Right |
| 0x48 | 9 | Orange Joystick push brake |
So in the previous example, where we can see a data value of zero for tag 0x08 and for tag 0x20, that would be a press of button A in the right pad.
For the joystick, there might be 1 or 2 bytes. It’s odd because there is no indication anywhere if the value is 1 or 2 bytes, the only way to know is because the second byte can only have the value 0x01 when present. As this is protocol buffers, if the most significant bit is set to 1, it means there is a continuation byte, so the length of the data is 2 bytes if the MSb of the first one is 1.
The value we get tells us the amount of push, reserving the least significant bit for the direction, right is zero, and left is 1. This is because of how protocol buffers stores negative numbers using the zigzag encoding. Even numbers are positive and odd numbers are negative. So in reality, this is just a signed number where negative values indicate ‘left’ and positive values are ‘right’.The other byte is set to 0x01 when we pass certain pushing threshold, but I’m unsure of the meaning. It may be used as a threshold to detect the joystick as a button click.
i.e.07-08-00-10-01-18-01-20-01-28-01-30-01-38-01-40-BE-01-48-00
The value for the button id 0x40 is 0xBE. In binary 10111110. We can see the rightmost bit is set to zero (even number), that means the value is positive and thus, joypad is pushed to the right.
We can also notice MSb is ‘1’, so there is a continuation byte. The 0x01 next to the 0xBE is the continuation, which means we need to put them together to get the complete value. As this is little endian and there are only 7 usable bits in every byte in protocol buffers, the result is 1 0111110, coincidentally the same value as before. (This is one of the cases where Protocol buffers is actually counter productive because uses 2 bytes to store a 1 byte value)
07-08-00-10-01-18-01-20-01-28-01-30-01-38-01-40-6B-48-00
The value for the button id 0x40 is 0x6B. In binary 01101011. The rightmost bit is set to one, meaning the joypad is pushed to the left.
MSb is zero, so no continuation byte.
The maximum value for either right or left is 200, but considering one bit is used for direction, the actual range is 0-100, so I guess this is really a percentage of total travel.
The threshold byte appears once we reach 70%
For the braking button (push orange joypad towards you) you just get the amount of force, the LSBit does not mean anything
07-08-00-10-01-18-01-20-01-28-01-30-01-38-01-40-00-48-C8-01
The value for the button id 0x48 is 0xC8. That means a braking power of 200, which is the maximum value.
It’s interesting to note that every second and idle message (0x15) is sent even if buttons are pressed.
Control Point Commands
Deducting the commands sent to the device has been much more difficult as most of the time you can’t tell what is the effect of a command on the device (no screen, no interaction)
For now the only commands that I’ve found are:
| Command | Parameters | Action | Description |
|---|---|---|---|
| 0x12 | 0x12,0x08,0x0A,0x06,0x08,0x02,0x10,0x0,0x18,[pattern] | Haptic feedback | Makes the device vibrate according to one of 123 different patterns |
| 0x18 | 0x05 | Reset the device | Resets the device |
Other commands that are sent to the device but whose purpose is unknown are:
| Command | Parameters | Notes |
|---|---|---|
| 0 | ||
| 0x02 | ||
| 0x08 | 0x86 0x06 or 0x82 0x06 | Sent periodically to the device |
| 0x0A | ||
| 0x28 | 0x0A | |
| 0x2D | 0x12 0x8 0x8 0x0 0x10 0x0 0x18 0x0 0x20 | |
| 0x38 | 0x03 | |
| 0x48 | 0x3C |
If someone is able to complete this information, I’ll be glad to hear from you.
The Journey
When I first took a look at the device, I though it would be very easy to just connect to it with NRF Connect app on the phone, explore the appropriate service and figure out the format of the messages.
I couldn’t have been more wrong.
As soon as I did it, I noticed nothing was coming out of their proprietary service’s notifiable characteristic, so it seemed like it needed some kind of activation command.
To find out the activation sequence, the only way was sniffing BLE traffic between Zwift App and the device.
I captured two or three sessions and started looking into the GATT messages.
There was an activation message, but after that, all the traffic was obviously encrypted, damn… I didn’t know anything about cryptography and I got quite discouraged.
Apparently not enough… I started to learn about BLE security and the different cryptographic methods. This guys like acronyms more than pizza. It’s all very confusing to start from zero and they are not even consistent with definitions, especially between different crypto libraries.
The most useful sources of information were the RFC 3610 (AES-CCM) and the ANSI X9.62 (ECDH), the BLE Core specification is a bit misleading as this implementation doesn’t follow the official format by the book.
While investigating the system and trying to test it out I found a few major hurdles to overcome, mainly because of the system pre requisites I had.
My application runs in Windows, under the .NET platform. There are quite a few, very confusing, flavors of .NET. The most advanced and updated is .NET6 or .NET 7
You will find the most recent versions of the System.Security.Crypto library there, where you can do all the operations I have enumerated, but there is a big problem, .NET6 is meant to be hardware independent so it does not have support for Bluetooth.
That makes my software to be stuck with .NET Framework 4.8 which is the latest .NET that supports hardware in Windows. Of course the Crypto libraries in .NET Framework 4.8 don’t have functions for calculating HKDF or AES-CCM encryption.
I tried a popular crypto library called Bouncy Castle then. Bouncy Castle was written initially for Java and was ported to C# afterwards. It is supposed to support all the necessary functions for doing this kind of encryption, but the documentation is simply MISSING.
There is no way to know how to call the functions, or what the parameters are. Most of the examples on the Internet are in Java and the method names and parameters do not match, so I got completely desperate and had to resort to OpenSSL.
OpenSSL 1.1.1 is what ZwiftApp uses for all their security needs, from HTTPS to BLE security, so that must be the best way I thought.
Oh, OpenSSL… of course it is a Native library (unmanaged code dll) which can’t be included directly in a managed .NET project. There is a .NET wrapper for it, but it is old (for older versions of OpenSSL which didn’t contain the CCM functions I needed) and unmantained, so that wasn’t a path I could follow either.
My solution was to make a DLL in C language, internally making all the calls I needed to do to OpenSSL and only exposing a few functions that can be marshalled from the C# project.
It’s not very pretty, but it works and I didn’t need to make a wrapper for all the endless OpenSSL crypto functions.
A few weeks later I had a running version of my project GTBikeV that used Zwift Play as a controller device for steering, braking, menu navigation and in game actions. Pretty neat!